Are you experiencing issues with your car’s AC system?
One possible culprit could be a faulty AC evaporator core. This vital component plays a crucial role in cooling the air inside your vehicle. If it malfunctions, you may notice symptoms such as weak airflow, lukewarm air, or strange odors.
But fear not, because in this professional’s guide, we will walk you through the process of diagnosing and fixing your car’s AC evaporator core. You will learn how to pinpoint the issue, remove and replace the core, and test and recharge the AC system.
Additionally, we will provide preventive maintenance tips to keep your AC running smoothly for years to come.
So, if you’re ready to take control of your car’s cooling system, let’s dive in and get started!
Key Takeaways
– Weak airflow, lukewarm air, and strange odors are common symptoms of a faulty AC evaporator core.
– Diagnosing and fixing AC evaporator core issues should be done by professionals.
– Diagnosing involves checking for refrigerant leaks and testing for blockages.
– Regular maintenance, such as replacing cabin air filters and keeping the AC system clean, can prevent common problems and extend the lifespan of the evaporator core.
Symptoms of a Faulty AC Evaporator Core
If your car’s AC is blowing warm air, it’s time to check out the symptoms of a faulty AC evaporator core and get ready to fix it! The AC evaporator core is a vital component of your car’s air conditioning system. It’s responsible for cooling down the air before it enters the cabin. A faulty evaporator core can lead to a variety of issues that affect the performance of your AC system.
One of the most common causes of a faulty AC evaporator core is a refrigerant leak. As the refrigerant leaks out, the cooling capacity of the evaporator core decreases, resulting in warm air blowing from the vents.
Another symptom is reduced airflow. If you notice that the amount of air coming out of the vents is significantly lower than usual, it could be due to a clogged evaporator core.
While some DIY repairs can be done, fixing a faulty AC evaporator core is best left to professionals. Diagnosing the issue requires specialized tools and expertise to determine the exact cause of the problem.
In the subsequent section, we’ll discuss the steps involved in diagnosing the issue and provide recommendations for fixing it.
Diagnosing the Issue
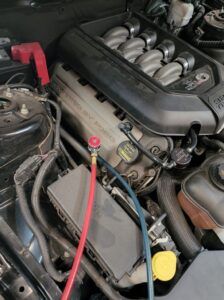
To diagnose the issue with your AC evaporator core, you need to check for refrigerant leaks and test the evaporator core for blockages. You should also inspect the AC system components. Start by using a leak detection kit to identify any leaks in the system. Next, perform a pressure test to determine if there are any blockages in the evaporator core.
Finally, visually inspect all the components of the AC system, including the condenser, compressor, and expansion valve, for any signs of damage or malfunction.
Checking for Refrigerant Leaks
When inspecting your car’s AC evaporator core, it’s essential to check for refrigerant leaks to ensure optimal functioning. AC system maintenance is crucial for maintaining proper refrigerant levels and preventing any potential leaks.
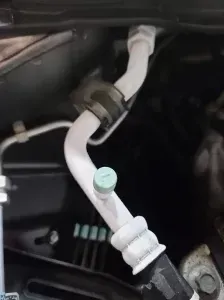
Start by visually inspecting the AC system components, such as the fittings, hoses, and connections, for any signs of refrigerant leaks. Look for oily residue, especially around the fittings, as this indicates a possible leak. You can also use a UV dye and a black light to detect leaks more easily.
If you suspect a leak, it’s recommended to use a refrigerant leak detector to pinpoint the exact location. Once you’ve checked for refrigerant leaks and ensured that everything is sealed properly, you can move on to testing the evaporator core for blockages.
Testing the Evaporator Core for Blockages
Now, take a moment to assess the state of your car’s evaporator core and feel a sense of empowerment as you test it for any potential blockages that could be hindering the performance of your AC system.
Start by visually inspecting the evaporator core for any visible signs of dirt, debris, or ice buildup.
Next, use a pressure gauge to measure the pressure on both the high and low sides of the system. If the pressure on the low side is significantly lower than normal, it could indicate a blockage in the evaporator core.
Additionally, you can use a borescope to inspect the inside of the core for any obstructions. If you find any blockages, it’s crucial to clean or replace the evaporator core to ensure proper functioning of your AC system.
Transitioning into the next section about inspecting the AC system components, it’s essential to thoroughly examine each component for any signs of damage or wear.
Inspecting the AC System Components
Take a moment to inspect the various components of your car’s AC system to ensure they are in good condition and functioning properly. Regular AC system maintenance is crucial in preventing common AC system problems. Here is a table that highlights the key components to inspect:
| Component | Inspection Points |
|———————|——————————————————————–|
| Compressor | Check for leaks, abnormal noise, and proper clutch engagement |
| Condenser | Inspect for damage, debris, and proper airflow |
| Expansion Valve | Ensure proper operation and check for any signs of blockages |
| Receiver Dryer | Look for any signs of moisture or contamination |
By inspecting these components, you can identify any potential issues that may affect the performance of your AC system. Once you have completed the inspection, you can move on to the next step of removing and replacing the AC evaporator core.
Transition: Now that you have inspected the AC system components, it’s time to move on to the process of removing and replacing the AC evaporator core.
Removing and Replacing the AC Evaporator Core
To successfully remove and replace your car’s AC evaporator core, you’ll need a few basic tools and the confidence to tackle this essential repair. Here’s a step-by-step guide to help you with the AC evaporator core installation:
1. Disconnect the battery: Before starting any work, always disconnect the negative terminal of the battery to ensure your safety.
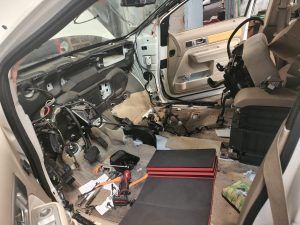
2. Remove the dashboard: The AC evaporator core is located behind the dashboard, so you’ll need to remove it to access the core. This usually involves removing screws, clips, and panels.
3. Disconnect and remove the old core: Once you have access to the core, disconnect the refrigerant lines, electrical connectors, and mounting bolts. Carefully remove the old core from its housing.
4. Install the new core: Place the new AC evaporator core into the housing and secure it with the mounting bolts. Reconnect the refrigerant lines and electrical connectors.
Now that you’ve successfully removed and replaced the AC evaporator core, you can move on to testing and recharging the AC system. This step is crucial to ensure proper functionality and prevent any further issues.
Testing and Recharging the AC System
Once you’ve completed the installation of the AC evaporator core, it’s time to ensure your car’s AC system is in optimal condition by testing and recharging it.
AC system maintenance is crucial to maintain a comfortable and cool interior temperature in your vehicle. Start by testing the AC system to identify any potential issues. Connect a pressure gauge to the low-pressure port and check the pressure readings. The proper refrigerant levels should fall within the manufacturer’s specifications. If the pressure is too low, it may indicate a refrigerant leak, while high pressure could signify a clogged or faulty component.
After testing, it’s important to recharge the AC system if necessary. Recharging involves adding refrigerant to achieve the proper levels. Begin by connecting a can of refrigerant to the low-pressure port and following the instructions on the can. Ensure that you follow the guidelines for the specific refrigerant type and vehicle model. Monitor the pressure gauge while adding refrigerant to prevent overcharging. Overcharging can damage the AC system and lead to poor performance.
With the AC system tested and recharged, you can now move on to preventive maintenance and care tips to keep your system running smoothly.
Preventive Maintenance and Care Tips
Maintaining and caring for your car’s AC system is essential to ensure optimal performance and a comfortable driving experience. Regular air conditioning maintenance can help prevent common AC problems and extend the lifespan of your vehicle’s evaporator core.
One of the most important preventive maintenance tasks is replacing your AC system’s cabin air filter. This filter traps dust, pollen, and other airborne particles, preventing them from entering the evaporator core and causing blockages or reduced airflow. It’s recommended to replace the cabin air filter every 12,000 to 15,000 miles or as specified by your vehicle manufacturer.
Additionally, keeping your car’s AC system clean is crucial. Regularly inspect and clean the condenser fins to remove any debris or dirt buildup. Use a soft brush or a low-pressure air hose to gently clean the fins, ensuring they’re free from obstructions that can hinder heat transfer.
Lastly, be mindful of any unusual signs or symptoms that may indicate a problem with your AC system. These may include weak airflow, strange odors, or unusual noises. If you notice any of these issues, it’s best to have your AC system inspected by a professional to diagnose and address the problem promptly.
By following these preventive maintenance and care tips, you can help keep your car’s AC system in excellent condition and avoid costly repairs down the road.
Frequently Asked Questions
What are some common signs that indicate a faulty AC evaporator core?
To troubleshoot a car’s AC system, look out for signs of AC compressor failure. Common indicators include weak airflow, warm air blowing from the vents, and strange noises coming from the compressor.
How can I determine if the issue with my car’s AC system is caused by a faulty evaporator core?
To determine if your car’s AC system issue is caused by a faulty evaporator core, you can try cleaning the AC system and using DIY troubleshooting techniques for car AC problems.
What are the steps involved in removing and replacing an AC evaporator core?
To remove and replace an AC evaporator core, you need to follow a series of precise steps. These steps involve disconnecting the AC system, removing the dashboard, accessing the core, replacing it, and reassembling the components.
How do I test and recharge the AC system after replacing the evaporator core?
To test and recharge your AC system after replacing the evaporator core, start by connecting a gauge to the low side port and checking the pressure. Then, use an AC recharge kit to add refrigerant until the pressure reaches the recommended level.
Are there any preventive maintenance and care tips to extend the lifespan of the AC evaporator core?
To extend the lifespan of your AC evaporator core, follow these preventive maintenance and care tips. Regularly clean and replace air filters, check for refrigerant leaks, and ensure proper airflow to prevent overheating and damage.
Conclusion
In conclusion, diagnosing and fixing your car’s AC evaporator core requires careful attention to symptoms and a systematic approach to troubleshooting. By following the steps outlined in this guide, you can successfully identify and address any issues with your AC system.
Remember to always prioritize preventive maintenance and regular care to ensure optimal performance and longevity of your AC evaporator core. With the right knowledge and tools, you can confidently maintain a comfortable and cool driving experience.